Developer Guide
Table of Contents
- Introduction to FastTrack
- Purpose of this guide
- How to use this guide
- Acknowledgements
- Setting up and getting started
- Design
- Implementation
- Documentation, logging, testing, configuration, dev-ops
- Appendix: Requirements
- Appendix: Instructions for manual testing
- Planned Enhancements
- Effort
FastTrack
FastTrack is an easy-to-use financial management desktop application designed for NUS SoC undergraduate students who are living on a tight budget. With a combination of a Command Line Interface (CLI) and Graphical User Interface (GUI), our app provides a user-friendly and efficient way to track your expenses and manage your finances.
Purpose of this guide
The purpose of this guide is to give you a comprehensive insight for developing and maintaining FastTrack.
If you are a developer, this guide will give you an overview of the high-level design and architecture of FastTrack. It also delves into the implementation and design considerations of FastTrack features, allowing you to learn the ins and outs of FastTrack in no time. If you are lost now, you can start by first looking at the set-up portion.
If you like to know more about the motivation behind FastTrack, checkout the requirements section where we cover the product scope as well as the user stories and use cases.
How to use this guide
Here are some notations used in this guide.
Format
-
Commandis used to label commands and components. - {Placeholder} are used to label placeholders.
- [Optional], square brackets are used to notate optional fields.
-
 Note is used to provide additional information that you should know.
Acknowledgements
- This project is based on the AddressBook-Level3 project created by the SE-EDU initiative
- Libraries used:
Setting up, getting started
Refer to the guide Setting up and getting started.
Design
This section gives you an overview of the different components of FastTrack and how they interact with each other.
.puml files used to create diagrams in this document can be found in the diagrams folder. Refer to the PlantUML Tutorial at se-edu/guides to learn how to create and edit diagrams.
Architecture
The Architecture Diagram given below explains the high-level design of the FastTrack and how each component is connected.
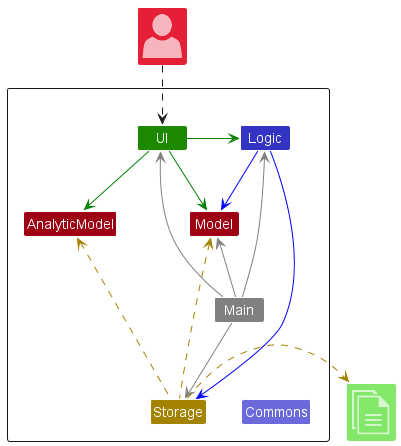
Main components of the architecture
Main has two classes called Main and MainApp. It is responsible for,
- At app launch: Initializes the components in the correct sequence, and connects them up with each other.
- At shut down: Shuts down the components and invokes cleanup methods where necessary.
Commons represents a collection of classes used by multiple other components.
FastTrack also consists of five other components.
-
UI: The UI of the App. -
Logic: The command executor. -
Model: Holds the data of the App in memory. -
AnalyticModel: Holds the data and outputs statistics based on the data in memory. -
Storage: Reads data from, and writes data to, the hard disk.
How the architecture components interact with each other
The Sequence Diagram below shows how the components interact with each other for the scenario where the user issues the command delete 1.
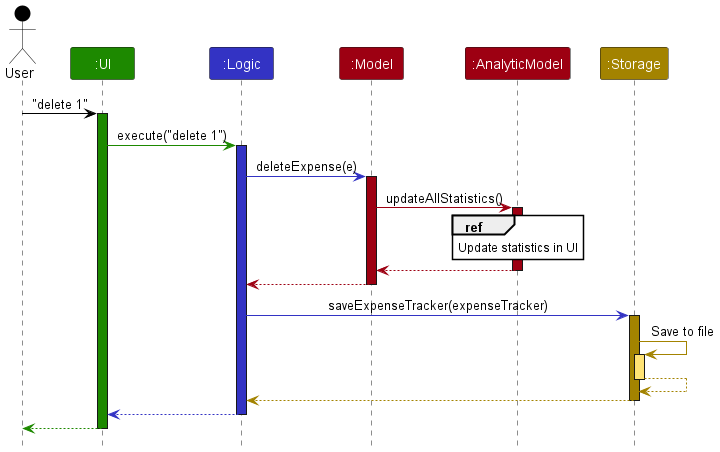
Each of the 5 main components (also shown in the diagram above),
- defines its API in an
interfacewith the same name as the Component. - implements its functionality using a concrete
{Component Name}Managerclass (which follows the corresponding APIinterfacementioned in the previous point.)
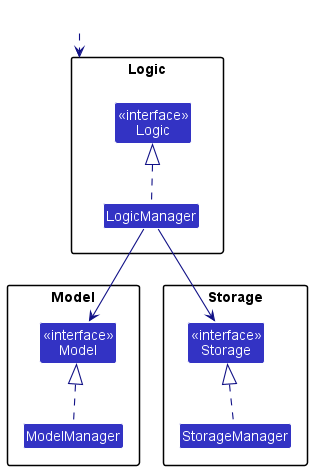
For example, the Logic component defines its API in the Logic.java interface and implements its functionality using the LogicManager.java class which follows the Logic interface. Other components interact with a given component through its interface rather than the concrete class (reason: to prevent outside component’s being coupled to the implementation of a component), as illustrated in the (partial) class diagram below.
The sections below give more details of each component.
UI component
This component is responsible for displaying and interacting with users of FastTrack through the GUI.
The API of this component is specified in Ui.java
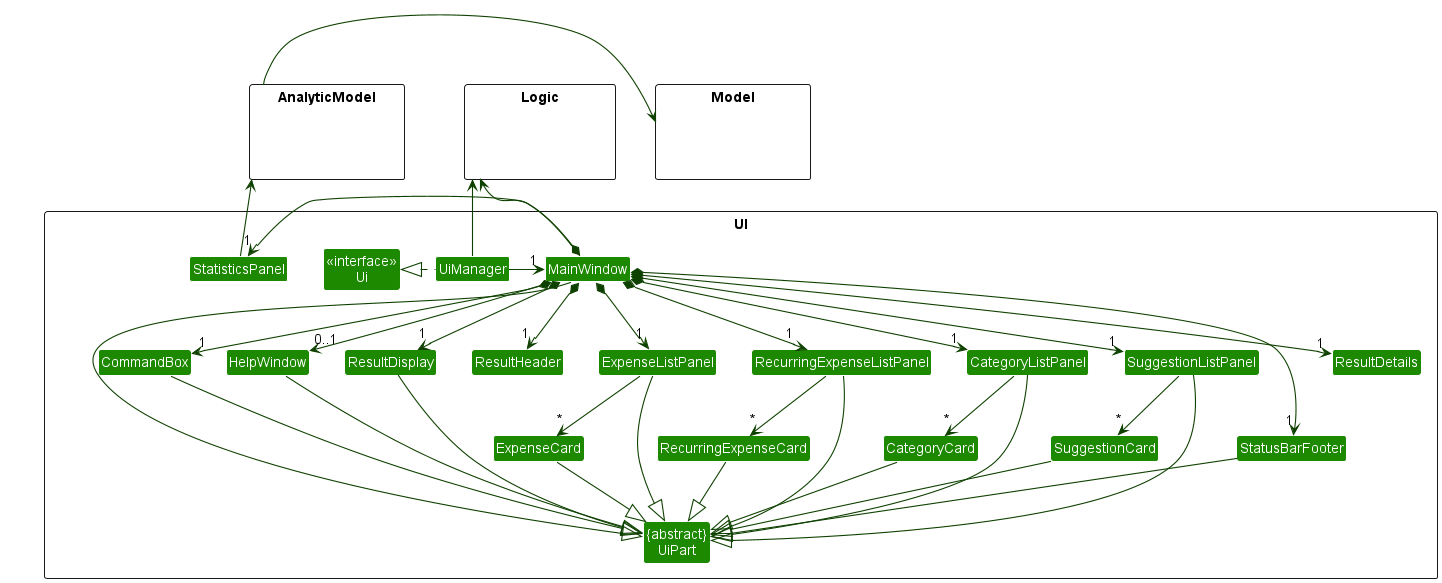
The UI consists of a MainWindow that is made up of the following parts.
-
CategoryListPanelCategoryCard
-
ExpenseListPanelExpenseCard
-
RecurringExpensePanelRecurringExpenseCard
StatisticsPanel-
CommandBox-
SuggestionListPanelSuggestionCard
-
-
ResultDisplayResultsHeaderResultsDetails
All these, including the MainWindow, inherit from the abstract UiPart class which captures the commonalities between classes that represent parts of the visible GUI.
The UI component uses the JavaFx UI framework. The layout of these UI parts are defined in matching .fxml files that are in the src/main/resources/view folder. For example, the layout of the MainWindow is specified in MainWindow.fxml
The UI component,
- executes user commands using the
Logiccomponent. - listens for changes to
Modeldata so that the UI can be updated with the modified data. - keeps a reference to the
Logiccomponent, because theUIrelies on theLogicto execute commands. - depends on some classes in the
Modelcomponent, as it displaysPersonobject residing in theModel.
Logic component
API : Logic.java
Here’s a (partial) class diagram of the Logic component, to help guide you along on how it works:
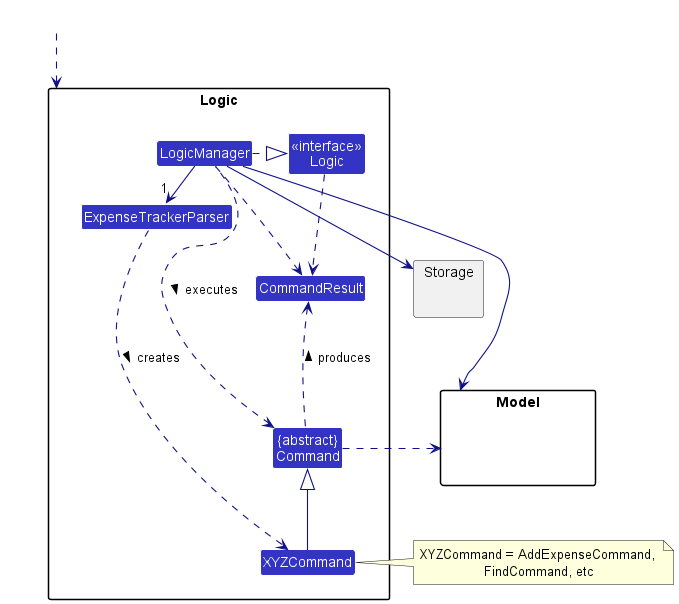
How the Logic component works:
- When
Logicis called upon to execute a command, it uses theExpenseTrackerParserclass to parse the user command. - This results in a
Commandobject (more precisely, an object of one of its subclasses’ subclass e.g.,AddCategoryCommand, which implementsAddCommand) which is executed by theLogicManager. - The command can communicate with the
Modelwhen it is executed (e.g. to add a category). - The result of the command execution is encapsulated as a
CommandResultobject which is returned back fromLogic.
The Sequence Diagram below illustrates the interactions within the Logic component for the execute("delcat 1") API call.
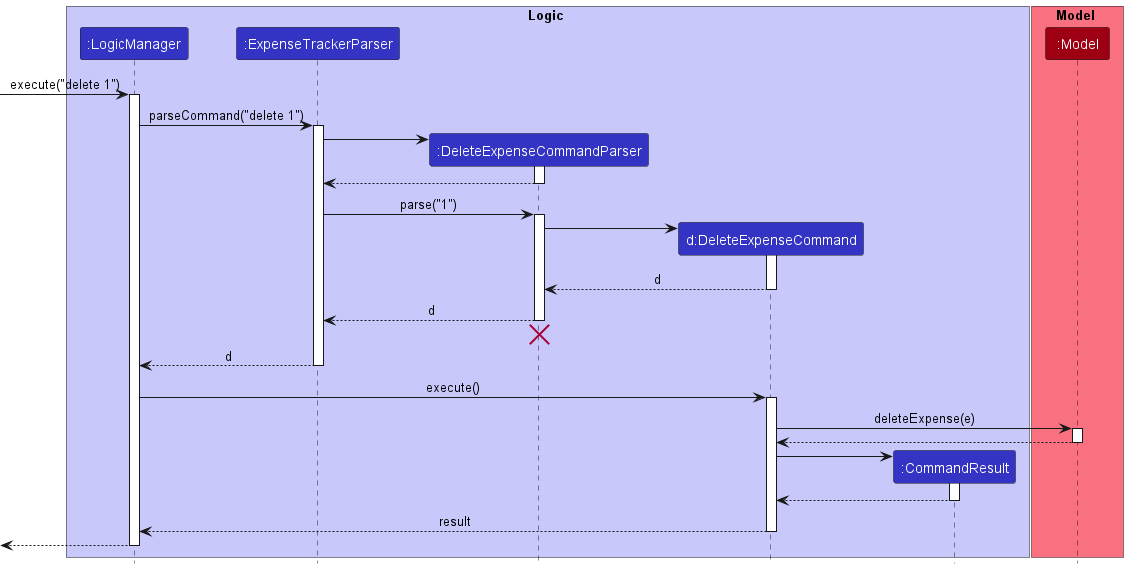
DeleteCommandParser should end at the destroy marker (X) but due to a limitation of PlantUML, the lifeline reaches the end of diagram.
Here are the other classes in Logic (omitted from the class diagram above) that are used for parsing a user command:
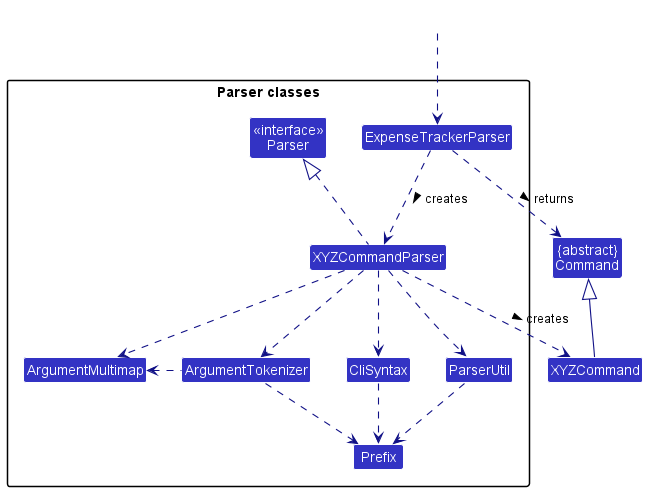
How the parsing works:
- When called upon to parse a user command, the
ExpenseTrackerParserclass creates anXYZCommandParser(XYZis a placeholder for the specific command name e.g.,AddCategoryParser) which uses the other classes shown above to parse the user command and create aXYZCommandobject (e.g.,AddCategoryCommand) which theExpenseTrackerParserreturns back as aCommandobject. - All
XYZCommandParserclasses (e.g.,AddCategoryParser,DeleteCategoryParser, …) inherit from theParserinterface so that they can be treated similarly where possible e.g, during testing.
Model component
API : Model.java
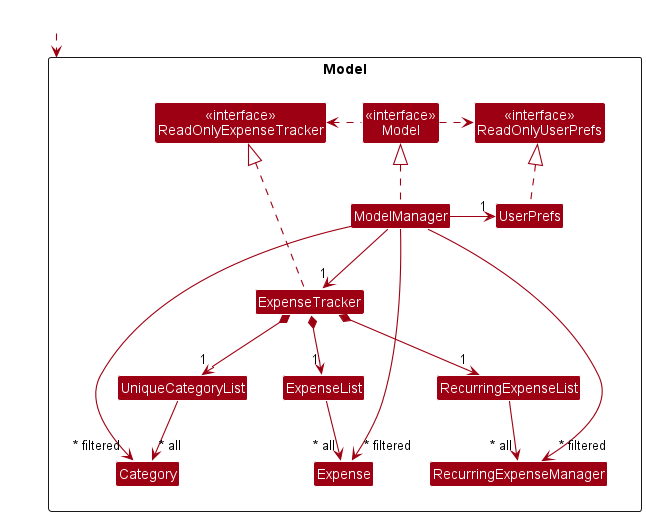
The Model component,
- contains the expense tracker data i.e., all
Categoryobjects (which are contained in aUniqueCategoryListobject), which is pulled from theReadOnlyExpenseTrackerinstance. - contains the currently ‘selected’
Categoryobjects (e.g., results of a search query) as a separate filtered list which is exposed to outsiders as an unmodifiableObservableList<Category>that can be ‘observed’ e.g. the UI can be bound to this list so that the UI automatically updates when the data in the list change. - contains the expense tracker data i.e., all
Expenseobjects (which are contained in aExpenseListobject), which is pulled from theReadOnlyExpenseTrackerinstance. - contains the currently ‘selected’
Expenseobjects (e.g., results of a search query) as a separate filtered list which is exposed to outsiders as an unmodifiableObservableList<Expense>that can be ‘observed’ e.g. the UI can be bound to this list so that the UI automatically updates when the data in the list change. - does not depend on any of the other four components (as the
Modelrepresents data entities of the domain, they should make sense on their own without depending on other components)
AnalyticModel component
API : AnalyticModel.java
The AnalyticModel component,
- contains the expense tracker data (i.e. all
ExpenseandCategoryobjects, which are respectively contained inExpenseListandUniqueCategoryListobjects), which are pulled from theReadOnlyExpenseTrackerinstance. - calculates statistics based on the expense tracker data available.
- listens to any changes made to expense tracker data (by attaching listeners to the
ExpenseList), thus dynamically updating statistics.
Storage component
API : Storage.java
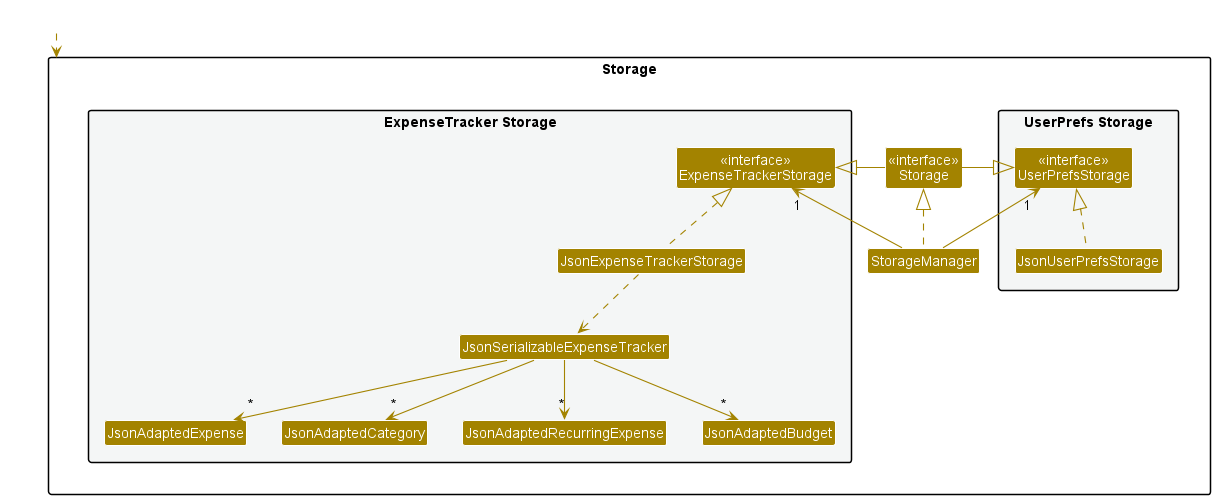
The Storage component,
- can save both expense tracker data and user preference data in json format, and read them back into corresponding objects.
- inherits from
ExpenseTrackerStorage - depends on some classes in the
Modelcomponent (because theStoragecomponent’s job is to save/retrieve objects that belong to theModel)
Common classes
Classes used by multiple components are in the seedu.addressbook.commons package.
Implementation
This section describes some noteworthy details on how certain features are implemented.
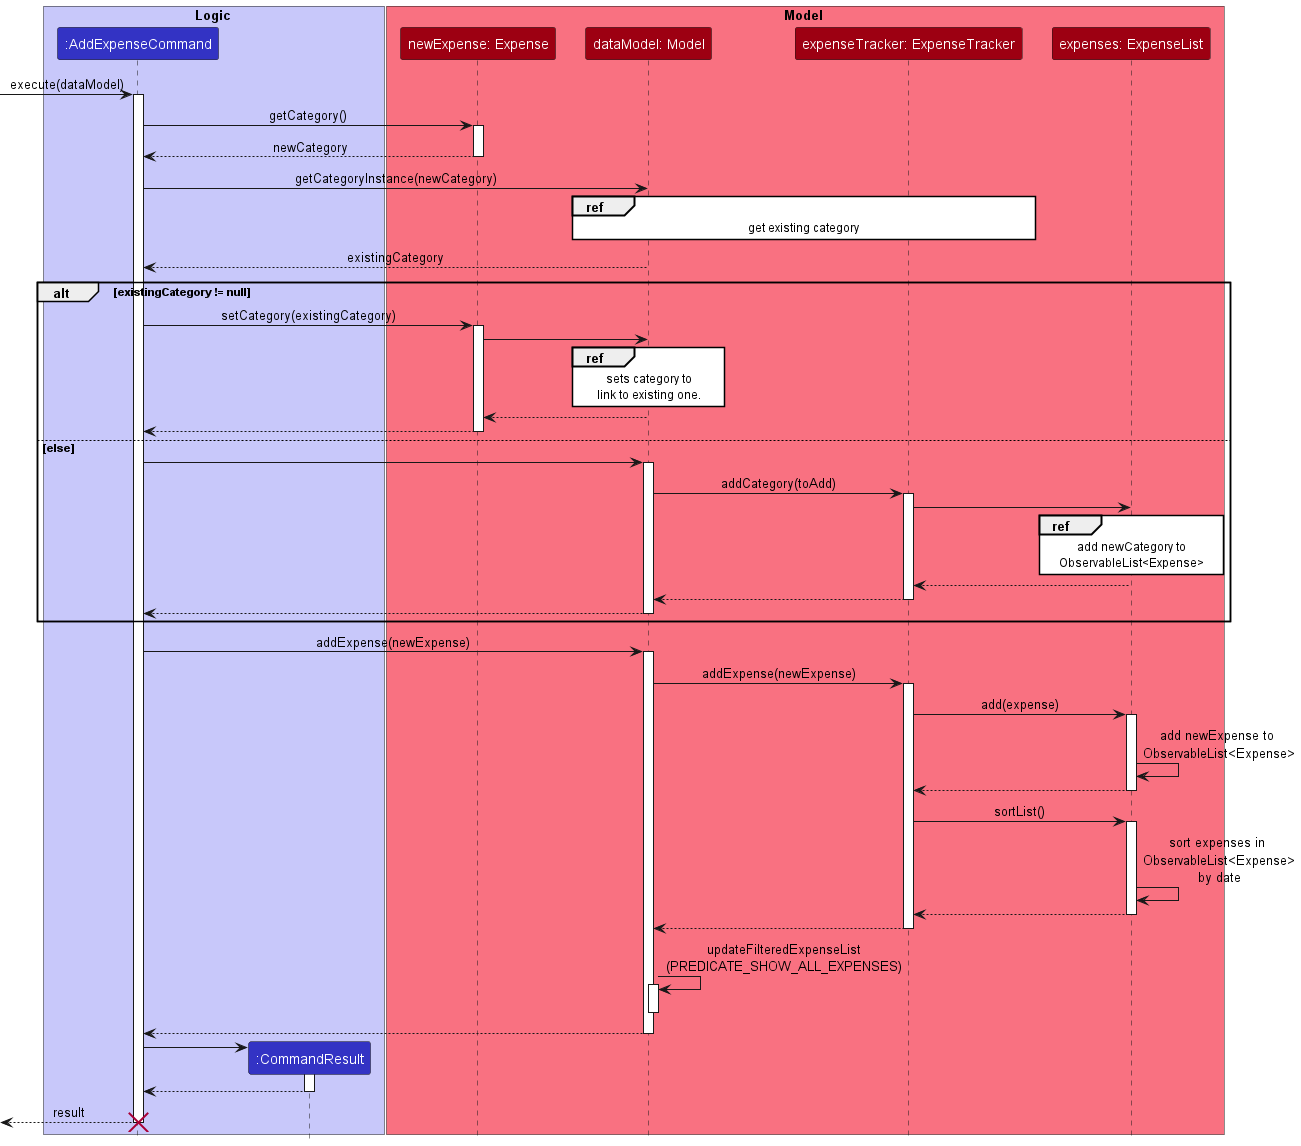
[Implemented] Add Expense feature
Command Format
add n/EXPENSE_NAME c/CATEGORY_NAME p/PRICE [d/DATE], whereby the date is an optional field.
What is this feature for?
The add command enables users to add an Expense to the ExpenseTracker.
Sequence of action
To aid you in understanding how exactly the add command works, here is a list of steps illustrating what occurs when LogicManager#execute() is invoked:
We will be using the user input add n/Milk p/4.50 c/Groceries as an example.
-
The user inputs
add n/Milk p/4.50 c/Groceriesin the command box. -
The input is then parsed and a
AddExpenseCommandobject is created using the given fields. -
AddExpenseCommand#execute()is called, which takes in the currently-running instance ofModeland adds theExpenseused to instantiate theAddExpenseCommandthrough theModel#addExpense()method, which adds the newExpenseobject to the list of currentExpenseobjects. Note that if the newly instantiatedExpensehas aCategorythat does not match any existingCategoryobjects, theExpenseobject’sCategorywill be added to theExpenseTrackeras a newCategory. -
A
CommandResultinstance is then returned, with feedback that theExpensewas successfully logged.
![]() Note:
Note:
- For step 2, if the user does not have any arguments, the
AddExpenseCommandobject will NOT be created!
A sequence diagram is provided as follows, which matches the list of steps mentioned above:
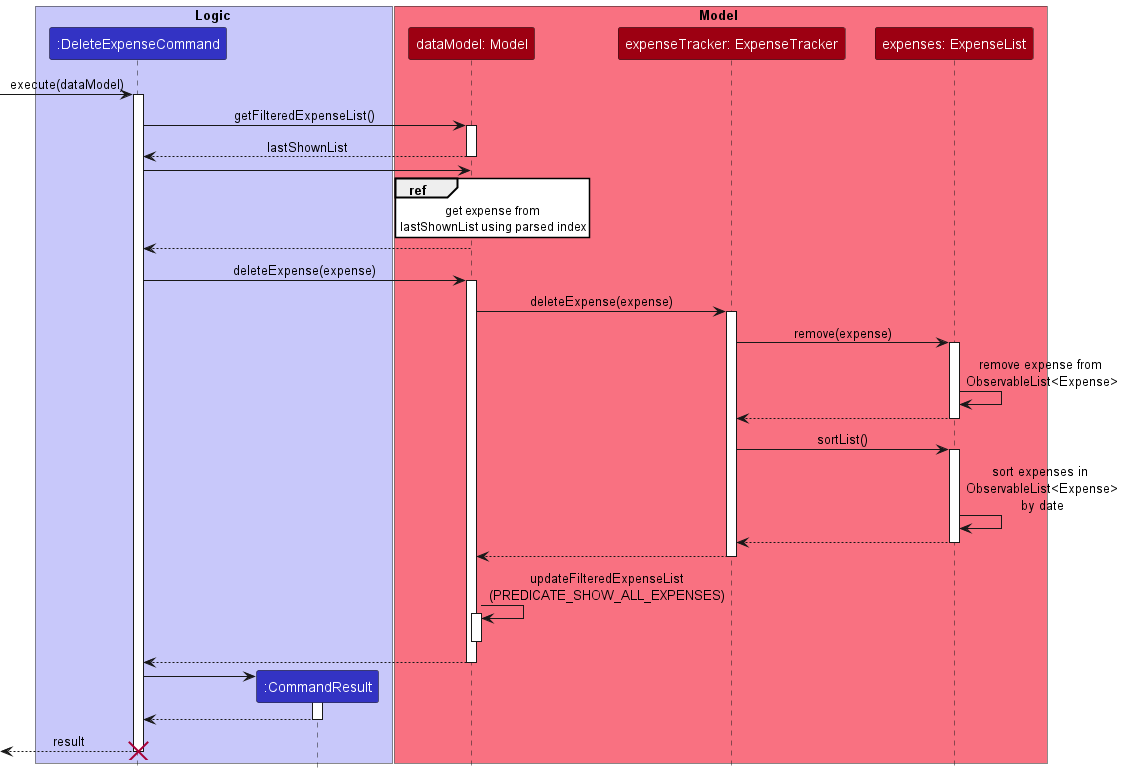
[Implemented] Delete Expense feature
Command Format
delete INDEX
What is this feature for?
The delete command enables users to delete an Expense from the ExpenseTracker.
Sequence of action
To aid you in understanding how exactly the delete command works, here is a list of steps illustrating what occurs when LogicManager#execute() is invoked:
We will be using the user input delete 1 as an example.
-
The user inputs
delete 1in the command box. -
The input is then parsed and a
DeleteExpenseCommandobject is created using the given fields. -
DeleteExpenseCommand#execute()is called, which takes in the currently-running instance ofModel, retrieves theExpenseobject at the specifiedINDEX, and deletes it from the underlying list ofExpenseobjects of theModelinstance usingModel#deleteExpense(). -
A
CommandResultinstance is then returned, with feedback that theExpensewas successfully deleted.
![]() Note:
Note:
- At step 2, if input is detected as invalid, an error will be shown on the screen and the sequence of action is terminated.
A sequence diagram is provided as follows, which matches the list of steps mentioned above:
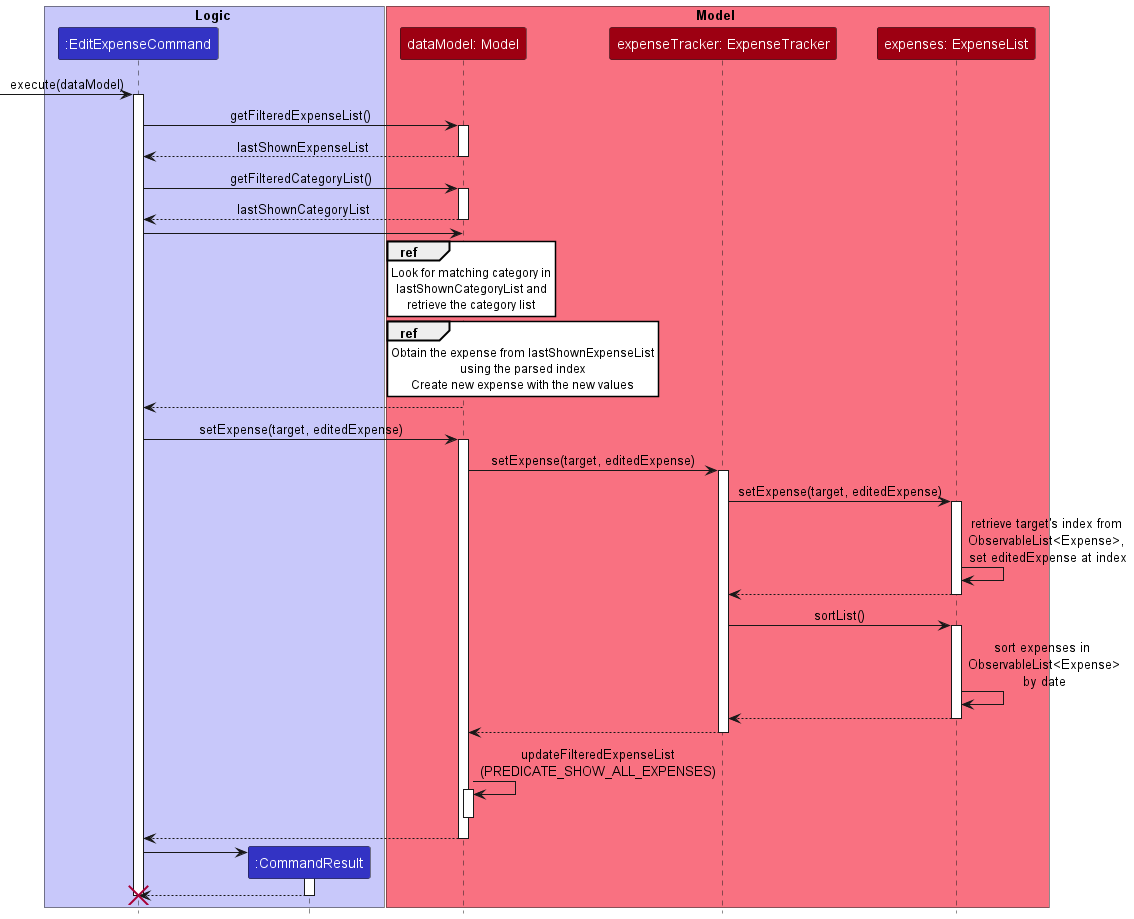
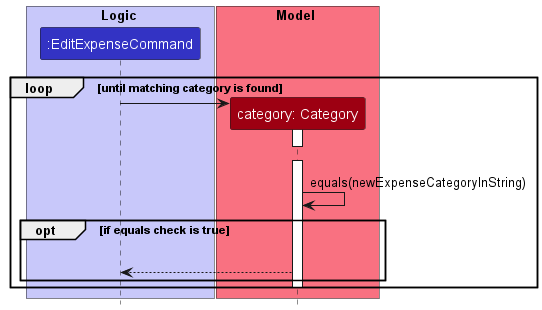
[Implemented] Edit Expense feature
Command Format
edexp INDEX [c/CATEGORY_NAME] [n/EXPENSE_NAME] [p/PRICE] [d/DATE], whereby all fields except the INDEX field are optional, BUT at least one of the optional fields
must be used (Otherwise, there is no purpose for calling this command).
What is this feature for?
The edexp command enables users to edit an Expense in the ExpenseTracker.
Sequence of action
To aid you in understanding how exactly the edexp command works, here is a list of steps illustrating what occurs when LogicManager#execute() is invoked:
We will be using the user input edexp 1 n/Chicken as an example, whereby the original Expense object has a EXPENSE_NAME of Milk.
-
The user inputs
edexp 1 n/Chickenin the command box. -
The input is then parsed and a
EditExpenseCommandobject is created using the given fields. -
The
LogicManager#execute()function causesEditExpenseCommand#execute()to be called, which takes in the currently-running instance ofModel, retrieves theExpenseobject at the specifiedINDEXfrom theFilteredList<Expense>of theModelinstance, and instantiates a newExpenseobject that has the same fields as the retrievedExpenseobject except for theEXPENSE_NAME. Note that if the newly instantiatedExpensehas aCategorythat does not match any existingCategoryobjects, theExpenseobject’sCategorywill NOT be added to theExpenseTrackeras a newCategory, and an error indicating that no suchCATEGORY_NAMEexists will pop up. -
The newly-instantiated
Expenseobject with the updatedEXPENSE_NAME, namelyChicken, will then replace the retrievedExpenseobject at the specifiedINDEXin theExpenseListusingModel#setExpense(). -
A
CommandResultinstance is then returned, with feedback that theExpensewas successfully edited.
![]() Note:
Note:
- At step 2, if the input is detected as invalid (either index is invalid or no arguments provided other than index), a matching error will be shown on the screen and the sequence of action is terminated.
- At step 3, if the user provides a category to edit to, and it is found that there is no such category in FastTrack, an error will be shown and the sequence of action is terminated.
A sequence diagram is provided as follows, which matches the list of steps mentioned above:
Design Considerations
Aspect: How the expense is edited:
-
Alternative 1 (Current choice): Retrieve the specified
Expense, instantiate a newExpensewith specified edited fields, and replace the retrievedExpensein theExpenseList.- Pros: As the UI implementation requires listening in on the
ObservableList<Expense>, replacing the previousExpenseobject with a newExpenseobject makes the live-refreshing of our UI much more intuitive. - Cons: There is an additional
Expenseobject being instantiated to replace the previousExpenseobject.
- Pros: As the UI implementation requires listening in on the
-
Alternative 2: Retrieve the specified
Expenseand use setter methods to set the specified fields to be edited.- Pros: No additional
Expenseobject needs to be instantiated, and it is easier to simply set the fields. - Cons: The listeners for the
ObservableList<Expense>only detect when there is an actual operation being done on the list, therefore setting fields will not cause the listeners to be updated, making our UI implementation much more complicated.
- Pros: No additional
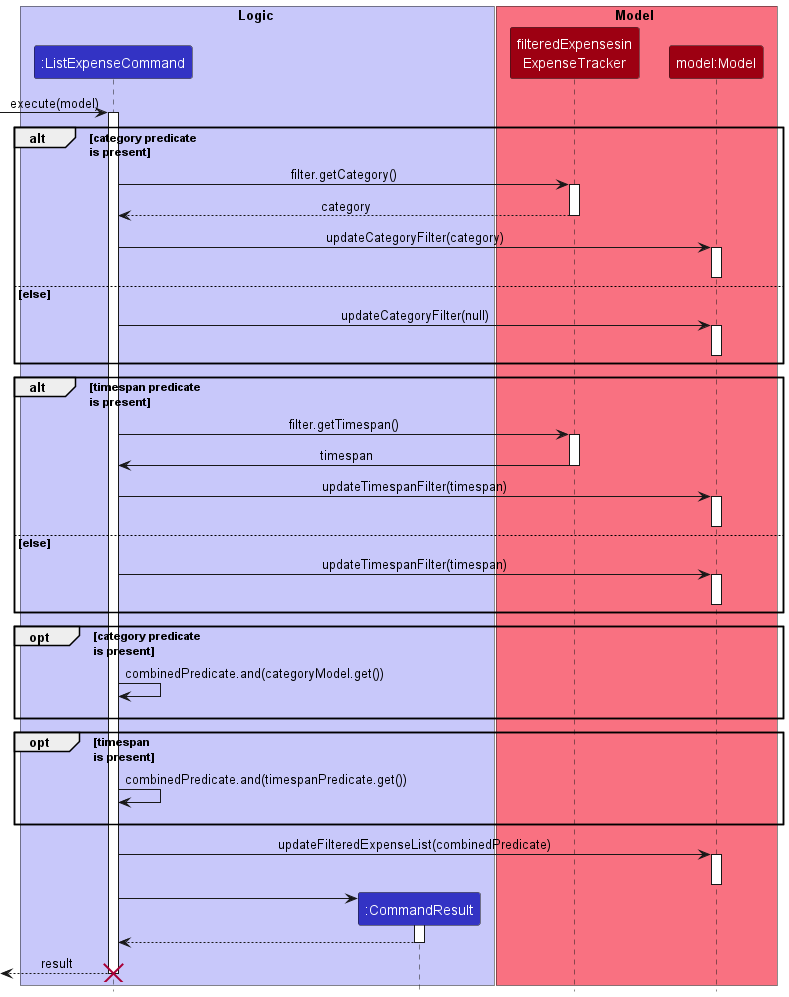
[Implemented] List feature
Command Format
list [c/CATEGORY_NAME] [t/TIMEFRAME], whereby both CATEGORY_NAME and TIMEFRAME are optional.
What is this feature for?
The list command enables users to view all expenses within the expense tracker, and even allows them to view the expenses affiliated with a certain category or timeframe, or a combination of both.
Sequence of action
To aid you in understanding how exactly the list command works, here is a list of steps illustrating what occurs when LogicManager#execute() is invoked:
We will be using the user input list c/Groceries t/week as an example.
-
The user inputs
list c/Groceries t/weekin the command box. -
The input is then parsed and a
ListExpensesCommandobject is created using the given fields. -
The
LogicManager#execute()function causesListExpensesCommand#execute()to be called, which takes in the currently-running instance ofModel, and applies theExpenseInCategoryPredicateandExpenseInTimespanPredicatesequentially onto theModelobject’sFilteredList<Expense>byModel#updateFilteredExpensesList(). -
A
CommandResultinstance is then returned, with feedback of how manyExpensesare currently listed under the current filters.
![]() Note:
Note:
- At step 2, if an invalid input is detected after
list(e.g.list xxxxxx), an error will be shown and the sequence of action is terminated.
A sequence diagram is provided as follows, which matches the list of steps mentioned above:
Design Considerations
Aspect: Whether to make ListExpensesCommand have multiple constructors or to make it take in ExpenseInCategoryPredicate and ExpenseInTimespanPredicate as Optional objects.
-
Alternative 1 (Current choice):
ListExpensesCommandtakes inOptional<ExpenseInCategoryPredicate>andOptional<ExpenseInTimespanPredicate- Pros: Makes for cleaner code, and allows for less clutter in terms of using multiple constructors.
- Cons: Usage of multiple constructors could have been easier to understand in terms of what the idea is.
-
Alternative 2:
ListExpensesCommandhas multiple constructors to differentiate the different possible cases of user input for filters.- Pros: Easier to understand, and all differentiation is done at the parsing stage.
- Cons: Much more cluttered and code will not be as clean.
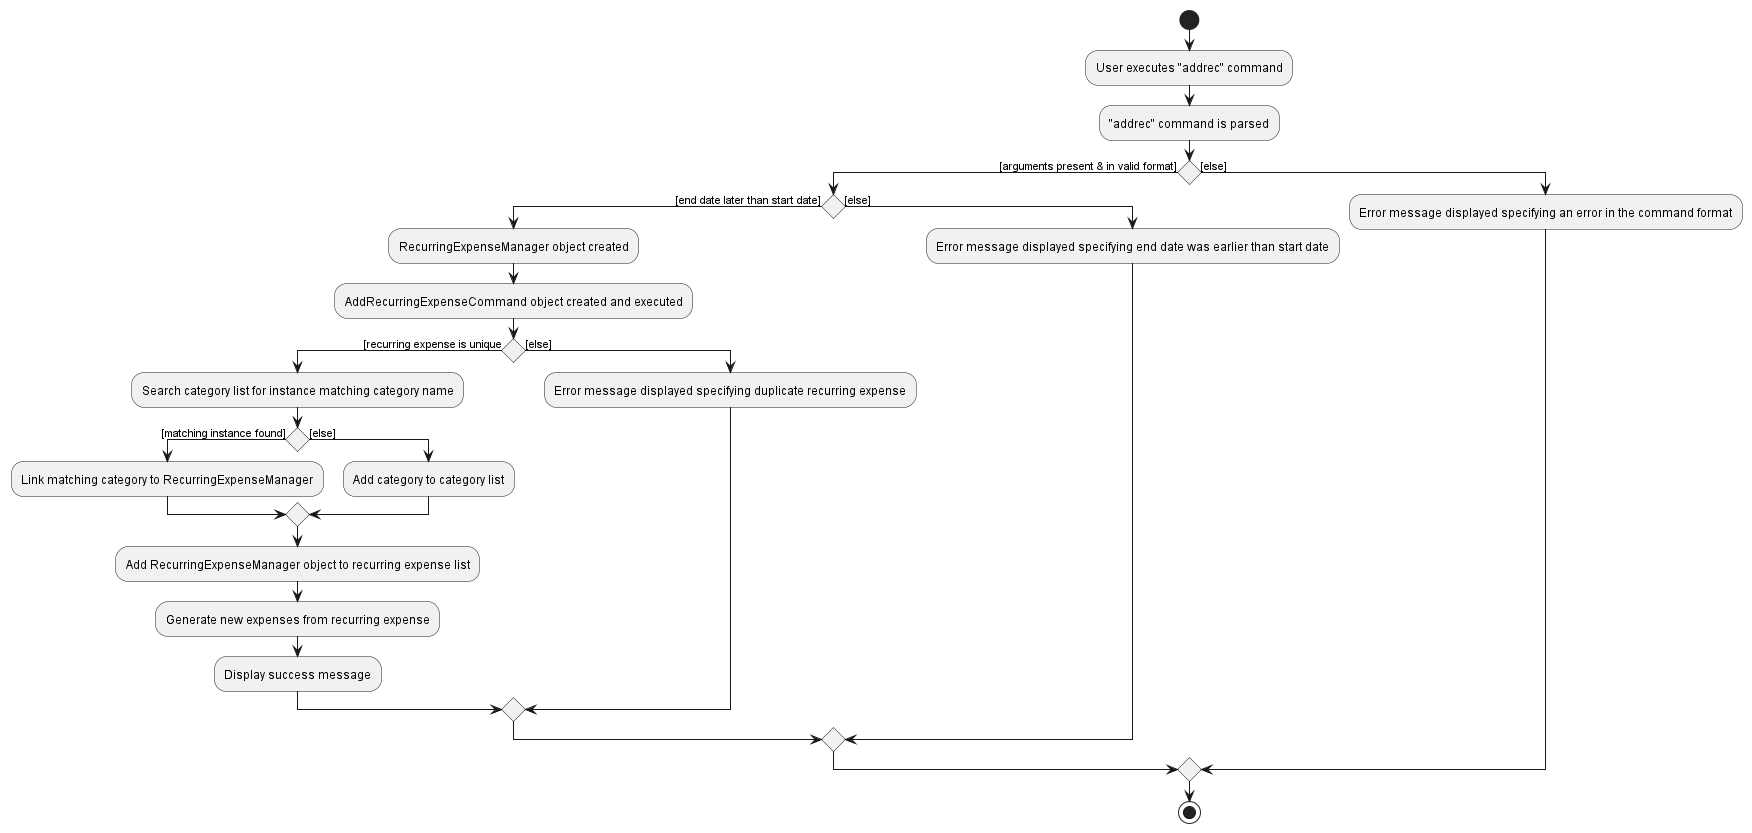
[Implemented] Add RecurringExpenseManager feature
Command Format
addrec n/EXPENSE_NAME c/CATEGORY_NAME p/PRICE sd/START_DATE t/FREQUENCY [ed/END_DATE], whereby only END_DATE is an optional field.
What is this feature for?
The addrec command enables users to add recurring expenses within the expense tracker, which will automatically generate expenses based on the provided FREQUENCY.
Sequence of action
To aid you in understanding how exactly the addrec command works, here is a list of steps illustrating what occurs when LogicManager#execute() is invoked:
We will be using the user input addrec n/Broth c/Groceries p/3 sd/06/04/23 t/week as an example.
-
The user inputs
addrec n/Broth c/Groceries p/3 sd/06/04/23 t/weekin the command box. -
The input is then parsed and a
AddRecurringExpenseCommandobject is created using the given fields. -
AddRecurringExpenseCommand#execute()is called, which takes in the currently-running instance ofModel, and adds the previously instantiatedRecurringExpenseManagerto theModelobject’s current list ofRecurringExpenseManagerobjects. Note that if the newly instantiatedRecurringExpenseManagerhas aCategorythat does not match any existingCategoryobjects, theRecurringExpenseManagerobject’sCategorywill be added to theExpenseTrackeras a newCategory. -
A
CommandResultinstance is then returned, with feedback of theRecurringExpenseManagerobject being successfully added.
![]() Note:
Note:
- At step 2, if any input is detected as missing or invalid, an error will be shown and the sequence of action is terminated.
- At the completion of step 3, due to the behavior of
RecurringExpenseManager, expenses will be retroactively added if the start date up till current date (or end date if end date is earlier) sufficiently spans the timeframe frequency.
An activity diagram is provided as follows, which matches and further elaborates on the list of steps mentioned above:
Design Considerations
Aspect: Whether Expense objects should be retroactively added for RecurringExpenseManager objects that have START_DATE in the past.
-
Alternative 1 (Current choice):
Expenseobjects are retroactively added.- Pros: Allows users to easily add recurring expenses, even if they are in the past.
- Cons: If the user keys in the wrong
START_DATE, they will need to take some time to manually remove all retroactively createdExpenseobjects.
-
Alternative 2:
Expenseobjects should not be retroactively added.- Pros: Wrong input for the
START_DATEwill not cause a flood of retroactively createdExpenseobjects to be added. - Cons: Users might not want to take the time to accurately add the
Expenseobjects in the past, which goes against our group’s aim.
- Pros: Wrong input for the
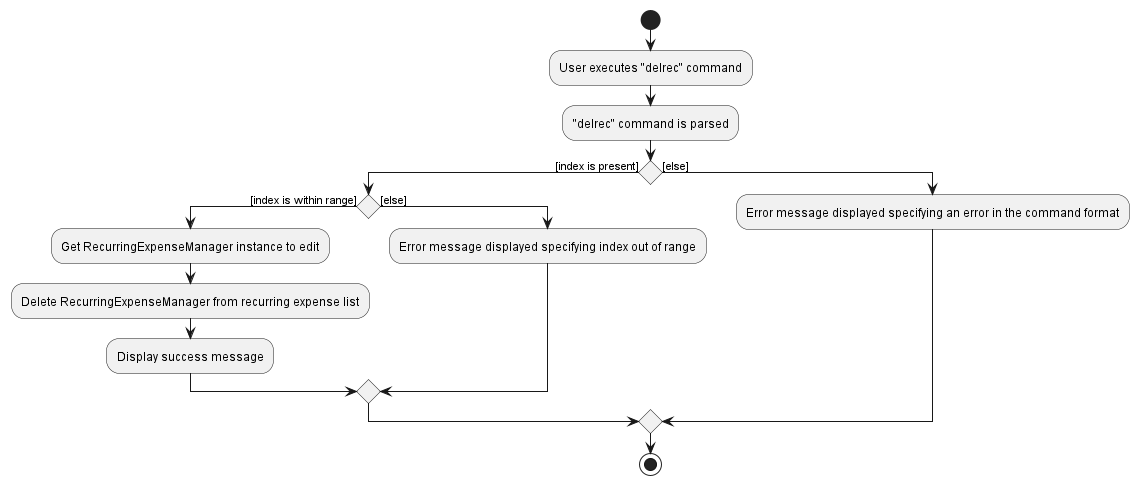
[Implemented] Delete RecurringExpenseManager feature
Command Format
delrec INDEX
What is this feature for?
The delrec command enables users to delete a RecurringExpenseManager from the ExpenseTracker.
Sequence of action
To aid you in understanding how exactly the delrec command works, here is a list of steps illustrating what occurs when LogicManager#execute() is invoked:
We will be using the user input delrec 1 as an example.
-
The user inputs
delrec 1in the command box. -
The input is then parsed and a
AddRecurringExpenseCommandobject is created using the given fields. -
DeleteRecurringExpenseCommand#execute()is called, which takes in the currently-running instance ofModel, retrieves theRecurringExpenseManagerobject at the specifiedINDEX, and deletes it from the underlying list ofRecurringExpenseManagerobjects of theModelinstance usingModel#deleteRecurringExpense(). -
The
RecurringExpenseManagerobject, after being added to the list of other currentRecurringExpenseManagerobjects, will retroactively add inExpenseobjects if theSTART_DATEandFREQUENCYmake sense to do so. (e.g. TheSTART_DATEis 03/02/2023, and theFREQUENCYis weekly, then, however manyExpenseobjects will be generated up-to-date to try and help the user track recurring expenses accurately.) -
A
CommandResultinstance is then returned, with feedback that theRecurringExpenseManagerobject was successfully deleted.
![]() Note:
Note:
- At step 2, if the index is detected as invalid or missing, an error will be shown and the sequence of action is terminated.
An activity diagram is provided as follows, which matches and further elaborates on the list of steps mentioned above:
Design Considerations
Aspect: Whether expenses generated by the RecurringExpenseManager object should also be deleted.
-
Alternative 1 (Current choice):
Expenseobjects generated by theRecurringExpenseManagerobject are NOT deleted upon the deletion of theRecurringExpenseManagerobject itself.- Pros: Makes more intuitive sense when a
RecurringExpenseManagerexpires or is terminated by the user, pastExpenseobjects should still remain as they have already been spent and allows for accurate tracking. - Cons: If user unintentionally keys in wrong information for the
RecurringExpenseManagerthat is irreversible in terms of generatingExpenseobjects, it could end up taking a while for them to manually delete theExpenseobjects.
- Pros: Makes more intuitive sense when a
-
Alternative 2:
Expenseobjects generated by theRecurringExpenseManagerobject are deleted upon the deletion of theRecurringExpenseManagerobject itself.- Pros: If user unintentionally keys in wrong information for the
RecurringExpenseManagerthat is generally irreversible in terms of generatingExpenseobjects, it is easily undone by simply deleting theRecurringExpenseManagerobject. - Cons: Users will not be able to accurately track past spendings as expired
RecurringExpenseManagerobjects will delete affiliatedExpenseobjects.
- Pros: If user unintentionally keys in wrong information for the
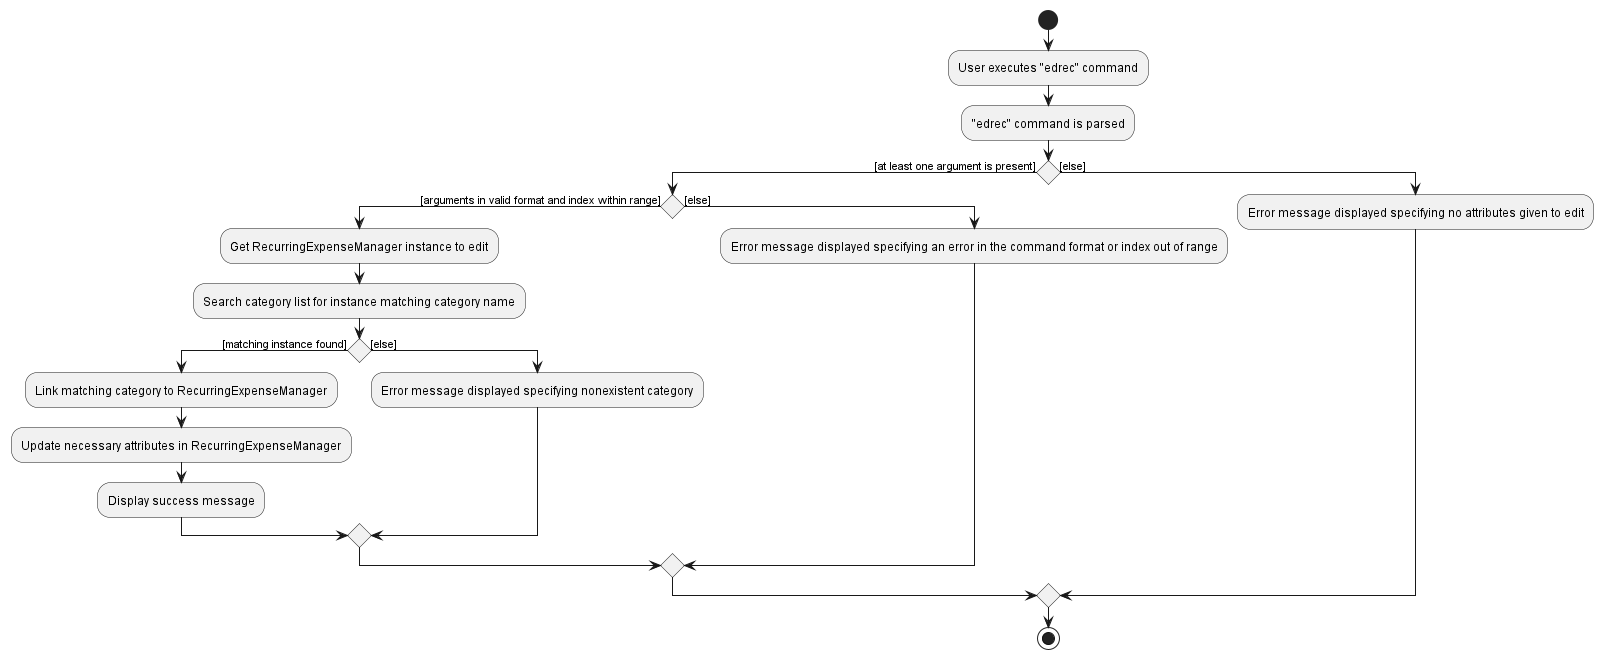
[Implemented] Edit RecurringExpenseManager feature
Command Format
edrec INDEX [n/EXPENSE_NAME] [c/CATEGORY_NAME] [p/PRICE] [t/FREQUENCY] [ed/END_DATE], whereby all fields except for INDEX are optional, but at least one
of them must be specified (Otherwise, there is no point in editing).
What is this feature for?
The edrec command enables users to edit a RecurringExpenseManager in the ExpenseTracker.
Sequence of action
To aid you in understanding how exactly the edrec command works, here is a list of steps illustrating what occurs when LogicManager#execute() is invoked:
We will be using the user input edrec 1 n/Coconut Milk as an example.
-
The user inputs
edrec 1 n/Coconut Milkin the command box. -
The input is then parsed and a
AddRecurringExpenseCommandobject is created using the given fields. -
EditRecurringExpenseManagerCommand#execute()is called, which takes in the currently-running instance ofModel, retrieves theRecurringExpenseManagerobject at the specifiedINDEXfrom theFilteredList<RecurringExpenseManager>of theModelinstance, and sets theEXPENSE_NAMEfield of theRecurringExpenseManagerobject found at the givenINDEXto beCoconut Milk. -
A
CommandResultinstance is then returned, with feedback that theRecurringExpenseManagerobject was successfully edited.
![]() Note:
Note:
- At step 2, if the index provided is detected as invalid or if no arguments other than index are provided, an error will be shown and the sequence of action is terminated.
- At step 3, if the user provides a category to edit to, and it is found that there is no such category in FastTrack, an error will be shown and the sequence of action is terminated.
An activity diagram is provided as follows, which matches and further elaborates on the list of steps mentioned above:
Design Considerations
Aspect: Whether the RecurringExpenseManager object should be replaced instead of having its fields set.
-
Alternative 1 (Current choice): Retrieve the specified
RecurringExpenseManagerand use setter methods to set the specified fields to be edited.- Pros: Easy to simply retrieve the
RecurringExpenseManagerobject and use setter for the fields. - Cons: If any future developments require close listening to the
ObservableList<RecurringExpenseManager>to be displayed in the UI, some refactoring might need to be done.
- Pros: Easy to simply retrieve the
-
Alternative 2: Retrieve the specified
RecurringExpenseManager, instantiate a newRecurringExpenseManagerwith specified edited fields, and replace the retrievedRecurringExpenseManagerin the underlyingRecurringExpenseList.- Pros: Future developments which rely on the
ObservableList<RecurringExpenseManagerwill be able to be smoothly implemented, as there are list operations being carried out by replacing objects. - Cons: Extra layers of code required to instantiate a new
RecurringExpenseManagerobject to replace the original.
- Pros: Future developments which rely on the
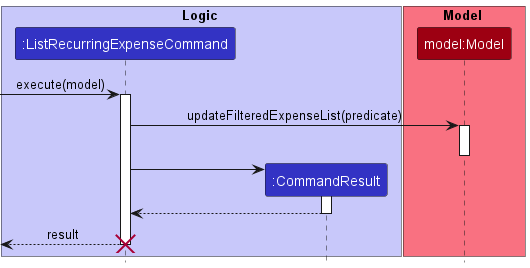
[Implemented] List RecurringExpenseManager feature
Command Format
lrec.
What is this feature for?
The lrec command enables users to view all RecurringExpenseManager objects within the expense tracker.
Sequence of action
To aid you in understanding how exactly the lrec command works, here is a list of steps illustrating what occurs when LogicManager#execute() is invoked:
We will be using the user input lrec as an example.
-
The user inputs
lrecin the command box. -
The input is then parsed and a
ListRecurringExpensesCommandobject is created using the given fields. -
The
LogicManager#execute()function causesListRecurringExpensesCommand#execute()to be called, which takes in the currently-running instance ofModel, and callsModel#updateFilteredExpenseList()withPREDICATE_SHOW_ALL_EXPENSES. -
A
CommandResultinstance is then returned, with feedback of how manyRecurringExpenseManagerobjects are present in the expense tracker, as well as switching to a screen of the list ofRecurringExpenseManagerobjects.
A sequence diagram is provided as follows, which matches the list of steps mentioned above:
Design Considerations
Aspect: Whether to make ListExpensesCommand have multiple constructors or to make it take in ExpenseInCategoryPredicate and ExpenseInTimespanPredicate as Optional objects.
-
Alternative 1 (Current choice):
ListExpensesCommandtakes inOptional<ExpenseInCategoryPredicate>andOptional<ExpenseInTimespanPredicate- Pros: Makes for cleaner code, and allows for less clutter in terms of using multiple constructors.
- Cons: Usage of multiple constructors could have been easier to understand in terms of what the idea is.
-
Alternative 2:
ListExpensesCommandhas multiple constructors to differentiate the different possible cases of user input for filters.- Pros: Easier to understand, and all differentiation is done at the parsing stage.
- Cons: Much more cluttered and code will not be as clean.
[Implemented] Add Category feature
Command format:
addcat c/NAME [s/SUMMARY] where NAME is the new category name and an optional SUMMARY of the category.
What is the feature about:
This command allows the user to add a new category to FastTrack. If the new category has the same name as an existing category in the database, the command will not be executed.
Sequence of actions:
- The user enters
addcat c/food s/expense on foodin the command box.
- The input is then parsed and a
AddCategoryCommandobject is created with the newCategoryobject.
-
AddCategoryCommand#execute()is called, which will trigger the model to add a category.
-
Model#addCategory()is called, which further callsExpenseTracker#addCategory().
-
UniqueCategoryList#add()is called to add the new category to FastTrack.
- A
CommandResultis returned.
![]() Note:
Note:
- At step 3, if the new category has the same name as an existing category, a
CommandExceptionwill be thrown and the sequence of action will be terminated.
As the sequence diagram for this feature is highly similar in idea to that of the add expense feature except for a difference in certain method names, there will be no sequence diagram provided.
[Implemented] Delete Category feature
Command format:
delcat INDEX where INDEX refers to the index of the category to be deleted when lcat is called.
What is the feature about:
This command allows user to delete a category of choice, expenses with the deleted category will have its category replaced with the MiscellaneousCategory. The category will be removed from the user’s database.
Sequence of actions:
- The user enters
delcat 1in the command box.
- The input is then parsed and a
DeleteCategoryCommandobject is created using the givenINDEX.
-
DeleteCategoryCommand#execute()is called, this will retrieve the category object to be deleted from the list of categories.
- This will call
Model#deleteCategory(), which will further callExpenseTracker#removeCategory().
-
UniqueCategoryList#remove()is called to remove theCategoryat index 2, andExpenseList#replaceDeletedCategory()is called to replace all expenses with the deletedCategorywithMiscellaneousCategory.
- A
CommandResultobject is returned.
![]() Note:
Note:
- At step 2, if an invalid
INDEXis given, aCommandExceptionwill be thrown and the sequence of action will be terminated. - At step 3, if the
INDEXgiven is out of range, aCommandExceptionwill be thrown and the sequence of action will be terminated.
As the sequence diagram for this feature is highly similar in idea to that of the delete expense feature except for a difference in certain method names, there will be no sequence diagram provided.
[Implemented] Edit Category feature
Command format:
edcat INDEX [c/NAME] [s/SUMMARY] where INDEX refers to the index of the category to be edited when lcat is called, NAME is the new name of the category, SUMMARY is the new summary of the category. Note that either a NAME or SUMMARY must be present for the command to be executed.
What is the feature about:
This command allows user to edit a category of choice. We allow users to edit either the category’s name, summary or both in this command.
Sequence of actions:
- User enters
edcat 1 c/food s/expense on foodin the command box.
- The input is then parsed and a
EditCategoryCommandobject is created using the given index1, new category namefoodand new summaryexpense on food.
-
EditCategoryCommand#execute()is called. The category to edit is obtained from theModeland stored ascategoryToEdit.
- The function checks that a new category name is present, thus it calls
UserDefinedCategory#setCategoryName()oncategoryToEdit, changing the name of the target category to the given new name.
- The function checks that a new category summary is present, thus is calls
UserDefinedCategory#setDescription()oncategoryToEdit, changing the summary of the target category with the given new summary.
- A
CommandResultobject is returned.
![]() Note:
Note:
- At step 2, if an invalid
INDEXis given or bothc/NAMEands/SUMMARYis missing, aCommandExceptionwill be thrown and the sequence of actions will be terminated. - At step 4, if there is a category with the same name as the new name given, a
CommandExceptionis thrown and the sequence of actions will be terminated.
As the sequence diagram for this feature is highly similar in idea to that of the edit recurringexpensemanager feature except for a difference in certain method names, there will be no sequence diagram provided.
Design considerations:
Aspect: How the category object is edited:
-
Alternative 1 (Current choice): Directly retrieve and edit the currently-specified
Categoryobject.- Pros: No need to re-point all
Expenseobjects currently affiliated with theCategoryobject that is being edited. - Cons: Mutates the state of the
Categoryobject, which might not be ideal if seeking immutability.
- Pros: No need to re-point all
-
Alternative 2 : Retrieve the specified
Categoryobject’s name and summary, and create a newCategoryobject that uses the same name and summary before replacing the required name or summary depending on user’s arguments.- Pros: Enforces immutability by replacing the previous
Categoryobject. - Cons: There is now a need to re-direct all
Expenseobjects affiliated with the previousCategoryobject of interest.
- Pros: Enforces immutability by replacing the previous
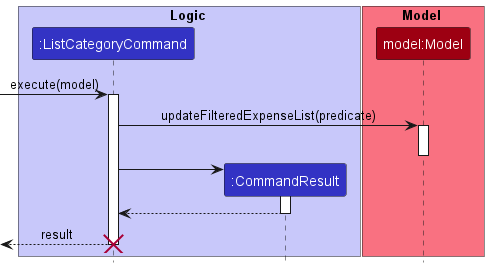
[Implemented] List Category feature
Command Format
lcat.
What is this feature for?
The lcat command enables users to view all Category objects within the expense tracker.
Sequence of action
To aid you in understanding how exactly the lcat command works, here is a list of steps illustrating what occurs when LogicManager#execute() is invoked:
We will be using the user input lcat as an example.
-
The user inputs
lcatin the command box. -
The input is then parsed and a
ListCategoryCommandobject is created using the given fields. -
The
LogicManager#execute()function causesListCategoryCommand#execute()to be called, which takes in the currently-running instance ofModel, and callsModel#updateFilteredExpenseList()withPREDICATE_SHOW_ALL_EXPENSES. -
A
CommandResultinstance is then returned, with feedback of how manyCategoryobjects are present in the expense tracker, as well as switching the screen to that of a list of theCategoryobjects.
A sequence diagram is provided as follows, which matches the list of steps mentioned above:
[Implemented] Recurring Expense feature:
What is the feature about:
Since recurring expenses are prominent in today’s society (e.g. Netflix, Transportation), therefore having a feature to allows FastTrack to regularly add recurring expenses automatically is a must.
To implement this feature, 3 classes were added:
The RecurringExpenseManager class:
The RecurringExpenseManager class is used as a generator of recurring expenses. When a user wants to add a recurring expense in FastTrack, the user can use the addrec command to create a new RecurringExpenseManager object. This object will have the following fields:
-
expenseName- Name of the recurring expense. -
amount- Unit price of the recurring expense. -
category- The category of the recurring expense. -
startDate- The date to start adding the recurring expenses. -
[endDate]- An optional ending date of the recurring expense. -
nextExpenseDate- The next date to charge the recurring expense. -
recurringExpenseType- The interval to charge the recurring expense (day, week, month, year).
The RecurringExpenseList class:
The RecurringExpenseList class works similar to the ExpenseList and UniqueCategoryList classes where is stores all the RecurringExpenseManager object created by the user.
The RecurringExpenseType class:
This is an enum class that stores the valid intervals (day, week, month, year) for a recurring expense. It also contains the RecurringExpenseType#getNextExpenseDate() method that calculates the next date given the interval and target date.
Sequence of actions:
Below is the sequence diagram when a user opens FastTrack:
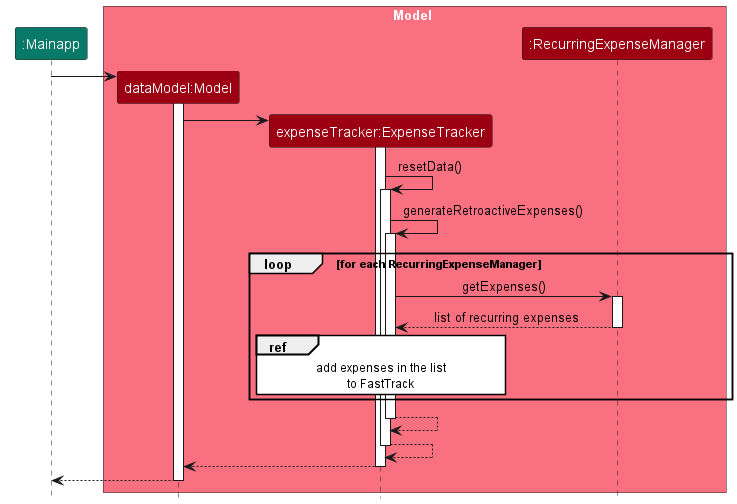
Pre-requisite: The user has added some RecurringExpenseManager into FastTrack and all RecurringExpenseManager objects have their nextExpenseDate updated.
- When the user reopens FastTrack,
Mainappwill instantiate a newModelandExpenseTrackerobject with the saved data. This will callExpenseTracker#resetData().
-
ExpenseTracker#generateRetroactiveExpenses()is then called, this method goes through the user’sRecurringExpenseListand calls theRecurringExpenseManager#getExpenses()method on each object.
- If the
nextExpenseDateof theRecurringExpenseManagerobject is equal or before today’s date, a new expense based on the parameters in theRecurringExpenseManagerobject will be added to a list untilnextExpenseDateis after today’s date orendDateif specified. The list is returned to theExpenseTracker.
- The
ExpenseTrackerwill then add each of the expenses in the returned list to FastTrack.
Design considerations:
Aspect: Making RecurringExpenseManager a class:
-
Alternative 1: Have a
RecurringExpenseManagerextend fromExpense. Consist of another list of recurring expenses generated by the RecurringExpenseManager.- Pros: Addition of 1 class only. Works similar to an
Expenseobject with just an addition list to store the recurring expenses. - Cons: Methods for adding a new recurring expense is longer as we need to traverse the entire expense list to locate the
RecurringExpenseManagerand add to the back of the list. Furthermore, the deletion of theRecurringExpenseManageralso removes the existing recurring expenses.
- Pros: Addition of 1 class only. Works similar to an
-
Alternative 2 (current choice): Abstract
RecurringExpenseManagerto its own class, similar to category.- Pros: Able to easily locate all
RecurringExpenseManagerobjects that the user created, making addition of recurring expenses into FastTrack simpler and quicker. Deletion of theRecurringExpenseManagerdoes not delete existing recurring expenses. - Cons: Requires the addition of another
RecurringExpenseListclass to store allRecurringExpenseManagerobjects. Tedious to maintain and implement.
- Pros: Able to easily locate all
Alternative 2 was chosen as it would be more ideal to abide by the Separation of Concerns principle. This allows proper separation of the generator class RecurringExpenseManager and the Expense class.
[Implemented] Budget feature:
Command format:
set p/AMOUNT where AMOUNT refers to the monthly budget amount.
What is the feature about:
This feature allows users to add a monthly budget to FastTrack. A weekly budget will be calculated for users by taking AMOUNT / 4. The Budget class is meant to be coupled with AnalyticModel to allow users to view helpful statistics such as remaining budget etc.
Sequence of actions:
Below is the sequence diagram when a user uses the set command:
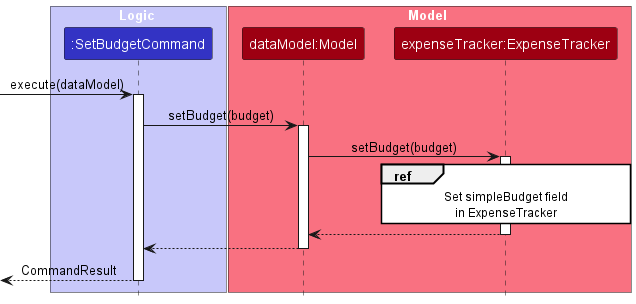
- User enters
set p/1000in the command box.
- The input is then parsed and a
SetBudgetCommandobject is created with aBudgetobject with an amount of1000.
-
SetBudgetCommand#execute()is called, this will further callModel#setBudget()andExpenseTracker#setBudget(). This will set the observablesimpleBudgetinExpenseTrackerto the given newBudget.
- A
CommandResultobject is returned.
![]() Note:
Note:
- At step 2, if an invalid amount is given, a
CommandExceptionwill be thrown and the sequence of action will be terminated.
Design considerations:
Aspect: Making Budget a class:
-
Alternative 1: Make budget a field with
Doubletype inExpenseTrackerrather than creating a new class.- Pros: Easier to implement as there is no need for a creation of a class.
- Cons: Budget related calculations have to be done within the
ExpenseTrackerclass, adding clutter. Modifications to the budget will also be more tedious as we have to locate these methods withinExpenseTracker.
-
Alternative 2 (Current choice): Make a new
Budgetclass.- Pros: Abstract all budget related operations to a class to maintain clean code. Modifications to budget related operations are also easier.
- Cons: Less convenient as it requires the creation of a new class.
Alternative 2 was chosen as it abides to the separation of concerns principle. This is to achieve better modularity and readability of the code base.
[Implemented] Expense Statistics Feature
What is the feature about:
FastTrack allows the user to view a summary of their expense statistics for both the current week and month. These statistics are displayed on the expense summary screen on the right window of the application and are updated automatically everytime the user adds, edits or deletes an expense from FastTrack.
The following statistics are calculated and displayed to the user. In FastTrack, the user is allowed to set only a monthly budget. A weekly budget is then defined as the value of the monthly budget divided by four (weeks).
-
Weekly Spending- Total amount spent for the current week -
Monthly Spending- Total amount spent for the current month -
Weekly Remaining- Amount of weekly budget remaining for the current week -
Monthly Remaining- Amount of monthly budget remaining for the current month -
Weekly % Change- Percentage increase/decrease of weekly spending relative to the previous week -
Monthly % Change- Percentage increase/decrease of monthly spending relative to the previous month -
Total Spent- The total amount the user has spent to-date -
Budget Utilised- The percentage of monthly budget that the user has utilised this month
Implementation Details
The current implementation of the expense summary feature requires consistent calculations of the user’s expense statistics. As such, an AnalyticModelManager, which implements the AnalyticModel interface is used to keep track of all of these statistics.
It contains fields which keep track of each individual statistic as mentioned in the above list, as well as specific methods to perform new calculations and updates to each of these fields.
AnalyticModelManager requires an instance of ExpenseTracker to read and obtain the following unmodifiable, ObservableList objects containing data from FastTrack:
-
allExpenses: anObservableListof Expense objects representing all expenses in the expense tracker -
allCategories: anObservableListof Category objects representing all expense categories in the expense tracker -
simpleBudget: aObjectProperty<Budget>object representing the monthly budget of the user.
The fields contained within AnalyticModelManager are of type DoubleProperty which implement the Observable interface. This allows the UI to establish bindings to each property.
A binding is a mechanism of JavaFX allows for the establishment of relationships between variables. The UI observes each DoubleProperty for changes, and then updates the GUI automatically when it detects that the DoubleProperty has changed.
Each DoubleProperty is updated using the respective calculation method, e.g. AnalyticModelManager#getWeeklySpent() for the weeklySpent property. A listener listens for changes in the ObservableList objects, allExpenses and allCategories.
Each time a change is detected, for example, when the user has deleted an expense or changed the amount of an expense, for each expense statistic, its corresponding calculation method is called, causing the corresponding property to be updated. This notifies the UI to update and display the new calculated expense statistics on the GUI.
This method of implementation closely follows the Observer Pattern, which promotes loose coupling between the UI and the AnalyticModelManager. Bindings can also be added or removed dynamically, making any changes to the expense summary statistics more flexible and adaptable.
Design Considerations
Aspect: Separation of Analytics and App Data:
-
Alternative 1 (Current choice): Create two separate
ModelManagercomponents, one for managing analytics and another for managing app data.- Pros: As analytics functions are read-only and do not require modifying the internal data of FastTrack, keeping the expense summary statistics in a separate component is ideal as it abides by the Separation of Concerns principle.
- Cons: Less convenient to implement as a new class would be created.
-
Alternative 2 : Store fields and methods for calculating expense summary statistics inside the existing
ModelManagercomponent.- Pros: Easier to implement as the class already exists, there is no need to instantiate another
AnalyticModelManagerclass.- Cons: Will result in the current
ModelManagerbeing cluttered due to the presence of many differing getter and setter methods. Violates the Separation of Concerns principle since the process of calculating statistics does not involve modifying the data within FastTrack, i.e. is purely read-only.
- Cons: Will result in the current
- Pros: Easier to implement as the class already exists, there is no need to instantiate another
Alternative 1 was chosen as it would be more ideal to abide by the principle of Separation of Concerns. Moreover, as many developers were working on features that require direct modification of the ModelManager component, separating analytics into another AnalyticModelManager eliminates the possibility of merge conflicts.
Aspect: GUI update when user updates expenses in FastTrack:
-
Alternative 1: Call methods to calculate and refresh the summary statistics after every user command.
- Pros: More convenient to implement since it is easy to ensure the GUI is always updated whenever the user enters a command
- Cons: Inefficient, as this would require tearing down and creating a new instance of each
UIcomponent in order to display the updated data. Redundant calculations would also need to be performed every single time the user enters a command that does not change the underlying expense data.
-
Alternative 2 (Current choice): Use the Observer Pattern to allow
UIto update whenever the underlying data of FastTrack changes- Pros: More efficient, since no redundant calculations are performed. The
AnalyticModelManageralso does not need a reference to theUIcomponent to perform an update, which reduces the coupling between these classes. - Cons: Was more time-consuming to implement, due to the need to learn about mechanisms like bindings and change listeners in JavaFX.
- Pros: More efficient, since no redundant calculations are performed. The
Alternative 2 was chosen as it was neater to implement and performs statistic calculations only when absolutely necessary, this preventing unnecessary wastage of computational resources.
[Implemented] Category Autocomplete feature
The category autocompletion feature in FastTrack is implemented using two UI classes, namely the SuggestionListPanel and the CommandBox.
The SuggestionListPanel is a JavaFX UI component responsible for displaying the suggestion list for the category autocomplete feature. It receives two parameters in its constructor, namely an ObservableList<Category> and a CommandBox.
The ObservableList<Category> contains all available categories in FastTrack, and the CommandBox is the UI component that contains a text field which allows users to enter commands, as well as for setting text to autofill.
To filter the categories based on the user’s input, the SuggestionListPanel makes use of a FilteredList<Category>. This filtered list is used as the data source for the ListView UI component of the SuggestionListPanel.
The FilteredList<Category> displays filtered categories based on whether the category name matches the user’s input.
Upon initialization, the SuggestionListPanel sets up autocomplete handlers for the suggestion list by calling the SuggestionListPanel#initialiseAutocompleteHandlers() method. This method registers listeners for focus changes, key presses, and autocomplete filters, which work together to ensure the autocomplete feature works responsively.
When the user enters a command, they can trigger the autocomplete feature by typing c/ followed by a few characters. These characters can then be used to filter the categories, and the most likely suggestions are displayed in the suggestion list.
To load the filter for autocompletion, the SuggestionListPanel#loadAutocompleteFilter() method within SuggestionListPanel#initialiseAutocompleteHandlers() sets up a listener for changes in the text field of the CommandBox.
If the user types c/ to start entering a category name, the SuggestionListPanel#getAutocompleteSuggestions() method is called to retrieve the most likely suggestions based on the user’s input so far.
This method filters the categories based on the user’s input and updates the filtered categories as the items in the ListView UI component of the SuggestionListPanel.
When the suggestion list is visible, the user can navigate through the suggestions using the UP and DOWN arrow keys.
The CommandBox#initialiseAutocompleteHandler() method adds a key press event filter to the command text field that listens for the UP arrow key.
When the user presses the UP arrow key, the focus is given to the SuggestionListPanel if it is visible (i.e. the user had typed in c/), and the SuggestionListPanel#selectLastItemOnFocus() method selects the last item in the suggestion list by default. When the user presses the DOWN arrow key, the SuggestionListPanel#handleDownArrowKey() method is called to check if the user is about to navigate out of the suggestion list and is responsible for returning the focus back to the CommandBox.
To select a category from the suggestion list, the user can either navigate through the list using the arrow keys and press the ENTER key or press the TAB key to select the bottom-most suggestion in the list.
When the user makes a selection using the ENTER key, a callback function within the SuggestionListPanel#addKeyPressListener() method is called. This function updates the suggested text in the CommandBox by calling the SuggestionListPanel#updateSuggestedText() method, which sets the text in the CommandBox and subsequently hides the suggestion list.
If the user makes the selection by pressing the TAB key, the CommandBox#initialiseAutocompleteHandler() method simulates a UP arrow key press followed by an ENTER key press, which also causes the first suggestion in the list to be selected.
Design considerations:
Aspect: How the autocomplete feature should be implemented:
-
Alternative 1 (Current choice): Add the autocomplete logic within the
SuggestionListPanelandCommandBoxclasses itself- Pros: This design is more convenient and allows the methods within each class to focus specifically on their own behaviors, without explicit knowledge of the autocomplete feature.
- Cons: Currently, the
SuggestionListPanelis tightly coupled to theCommandBoxthrough its constructor parameters. This means that more modifications would need to be made if a new text input component was introduced.
-
Alternative 2 : Create a new
AutocompleteLogicclass which uses the Observer Pattern to listen to and propagate changes across theSuggestionListPanelandCommandBoxcomponents.- Pros: Enforces loose coupling by the Observer Pattern
- Cons: Tedious to implement, and the added flexibility might be unnecessary since the autocomplete feature is not likely to be further extended upon.
Documentation, logging, testing, configuration, dev-ops
Appendix: Requirements
Product scope
Target user profile:
- NUS undergraduate students from the School of Computing
- Tech-savvy and able to type fast
- Comfortable using CLI apps
- Has to manage a large number of different general consumption and professional recurring expenses
Value proposition:
- Easy-to-use and allows students to log their daily expenses quickly and efficiently via a CLI
- Students can keep track of their spending habits with informative statistics
- FastTrack provides visual feedback and suggestions to help NUS students make more informed financial decisions
User stories
Priorities: High (must have) - * * *, Medium (nice to have) - * *, Low (unlikely to have) - *
| Priority | As a … | I want to … | So that I can… |
|---|---|---|---|
* * * |
New user | See usage instructions | Refer to instructions when I forget how to use the app |
* * * |
NUS Computing Student | Add my own expense categories | Categorise my expenses with a high degree of customisation |
* * * |
NUS Computing Student | Delete an expense category | Remove categories that I no longer need |
* * * |
NUS Computing Student | List all categories | See all my categories at a glance |
* * * |
NUS Computing Student | Log an expense in a single command | Keep track of expenses in the system |
* * * |
NUS Computing Student | List all expenses in total | Get an overview of my expenses |
* * * |
NUS Computing Student | List all expenses by category | Analyse my expenses in each category |
* * * |
NUS Computing Student | Delete an expense | Remove expenses which I have keyed in incorrectly |
* * * |
NUS Computing Student | See a summary of my expenses | Analyse and correct my spending habits |
* * * |
NUS Computing Student | Keep track of Software-As-A-Service/application hosting subscriptions | Be prepared when a recurring expense is due soon |
* * * |
NUS Computing Student | Find an expense based on a keyword | Easily filter expenses based on their name |
* * * |
NUS Computing Student | Edit an expense | Update the details of an expense without deleting and creating a new one |
* * * |
NUS Computing Student | See how much I have spent in total in the list | Can see how much I have spent in total for any number of expenses in the list |
* * |
NUS Computing Student | See my expense to budget statistics | Ensure my expenses are within or have exceeded a predefined budget |
* * |
NUS Computing Student | List all expenses for a specified time frame | Track my expenses on a timely basis |
* * |
NUS Computing Student | Add descriptions to my categories containing additional details | Define my categories distinctly |
* * |
NUS Computing Student | See a percentage breakdown of my expenses | Be aware of what categories I should spend less on |
* * |
NUS Computing Student | Get feedback on how I can change my spending habits | Develop good financial habits |
Use cases
(For all use cases below, the System is FastTrack and the Actor is the user, unless specified otherwise)
Precondition: The user has launched the FastTrack application
Use case: UC1 - Add category
MSS
- User requests to add a new category to FastTrack.
- User enters the add command with the category name.
- FastTrack adds the new category.
-
FastTrack responds with a success message indicating the category has been successfully added.
Use case ends.
Extensions
-
2a. The user does not enter the required category name.
- 2a1. FastTrack responds telling the user that a name is required and the command is invalid.
- 2a2. User enters add command with the category name.
-
2a3. Steps 2a1-2a2 are repeated until the data entered are correct.
Use case resumes at step 3.
-
2b. The category name already exists
- 2b1. FastTrack informs the user that the category name has already been used and prompts the user for a different category name.
- 2b2. User enters add command with the category name.
-
2b3. Steps 2b1-2b2 are repeated until the data entered are correct.
Use case resumes at step 3.
Use case: UC2 - Delete a Category
MSS
- User lists all categories using UC4.
- User requests to delete a category from FastTrack.
- User enters the delete command with the index i of the category to be deleted.
- FastTrack deletes the category at index i.
-
FastTrack displays a success message to the user indicating the category has been successfully deleted.
Use case ends.
Extensions
-
3a. The user selects an invalid category index (the index is out of bounds of the list)
- 3a1. FastTrack displays an error message telling the user to key in a valid index.
- 3a2. User enters delete command with the category index.
-
3a3. Steps 3a1-3a2 are repeated until the data entered are correct.
Use case resumes at step 4.
Use case: UC3 - Edit an Expense
MSS
- The user lists all expenses using UC7.
- The user selects the expense they want to edit from the list of expenses.
- User keys in the command to edit the expense.
- FastTrack responds with a success message indicating the expense has been successfully edited.
Extensions
- 2a. The user selects an expense that does not exist.
- 2a1. FastTrack displays an error message and does not allow the user to edit the expense.
- 2b. The user tries to save an expense with invalid or missing data.
- 2b1. FastTrack displays an error message indicating the fields that need to be corrected.
Precondition: The user has created at least one expense in the app
Use case: UC4 - List all Categories
MSS
- User requests to list all categories.
- FastTrack displays all categories.
Use case ends.
Extensions
- 2a. The user does not have any categories.
- 2a1. FastTrack only displays the Misc category
Use case: UC5 - Add an expense
MSS
- User wants to add an expense to be tracked.
- User keys in the command to add an expense to be tracked.
- FastTrack responds with a successfully added message.
Extensions
-
2a. User keys in information in wrong format.
- 2a1. FastTrack returns an error, requesting that the user inputs information in the correct format.
- 2a2. User inputs information again.
-
2a3. Steps 2a1-2a2 are repeated until the information being input is of the correct format.
Use case resumes from step 3.
Use case: UC6 - Delete an expense
MSS
- User wants to delete an expense that has been tracked.
- User uses UC7 (to list out all expenses currently added).
- User keys in the command to delete the expense.
-
FastTrack responds with a successfully deleted message.
Use case ends.
Extensions
-
3a. User keys in an invalid expense index.
- 3a1. FastTrack returns an error, requesting that the user inputs the correct expense index.
- 3a2. User inputs information again.
-
3a3. Steps 3a1-3a2 are repeated until the expense index being input by the user is valid.
Use case resumes from step 4.
MSS
Use case: UC7 - List all expense
MSS
- User requests to list all expense.
-
FastTrack displays all expenses added by user.
Use case ends.
Use case: UC8 - List all expense in a given category
MSS
- User requests to list all expense in a given category.
- FastTrack displays all expenses in a given category added by user. Use case ends.
-
1a. User does not enter a category.
-
1a1. FastTrack displays error message.
Use case ends.
-
-
1b. The given category is invalid.
-
1b1. FastTrack displays an error message.
Use case ends.
-
Use case: UC9 - List all expense in the past week
MSS
- User requests to list all expense in the past week.
-
FastTrack displays all expenses added by user in the past week .
Use case ends.
Use case: UC10 - List all expense in a given category in the past week
MSS
- User requests to list all expense in a category in the past week.
-
FastTrack displays all expenses added by user in the category in the past week.
Use case ends.
Use case: UC11 - Find an expense
MSS
- User requests to find an expense.
-
FastTrack displays all expenses related to the keyword provided.
Use case ends.
Use case: UC12 - Clear all expenses from the expense log
MSS
- User wants to wipe all currently-logged expenses.
-
User keys in the command to clear all logged expenses.
Use case ends.
Use case: UC13 - Get Help within the app
MSS
- User wants to check help for the commands to use FastTrack.
- User keys in the command to get help.
-
FastTrack opens a pop-up window to show help for commands and a link to the User Guide.
Use case ends.
Use case: UC14 - Exit from FastTrack
MSS
- User wants to exit the application.
- User keys in the command to exit the application.
-
FastTrack exits and is closed.
Use case ends.
Use case: UC15 - Add a recurring expense
MSS
- User wants to add a recurring expense to be tracked.
- User keys in the command to add a recurring expense.
-
FastTrack responds with a successfully added message.
Use case ends.
Extensions
- 2a. User keys in invalid information or wrongly-formatted information.
- 2a1. FastTrack returns an error, requesting that the user inputs information in the correct format.
- 2a2. User inputs information again.
-
2a3. Steps 2a1-2a2 are repeated until the information being input is of the correct format.
Use case resumes from step 3.
Use case: UC16 - List all recurring expense generators
MSS
- User requests to list all recurring expense generators.
-
FastTrack displays all recurring expense generators added by user.
Use case ends.
Use case: UC17 - Delete a recurring expense
MSS
- User lists all recurring expense generators using UC16.
- User requests to delete a recurring expense generator from FastTrack with the index of the recurring expense generator to be deleted.
- FastTrack deletes the recurring expense generator indicated at the index.
-
FastTrack displays a success message to the user indicating that the recurring expense generator has been successfully deleted.
Use case ends.
Extensions
- 2a. The user selects an invalid index.
- 2a1. FastTrack displays an error message telling the user to key in a valid index.
- 2a2. User re-enters the delete command with the index.
- 2a3. Steps 2a1-2a2 are repeated until the index provided is valid.
Use case resumes from step 3.
Use case: UC18 - Edit a recurring expense
MSS
- User lists all recurring expense generators using UC16.
- User requests to edit a recurring expense generator from FastTrack with the index of the curring expense generator to be edited as well as the fields to be edited.
- FastTrack edits the recurring expense generator indicated at the index.
-
FastTrack displays a success message to the user indicating that the recurring expense generator has been successfully edited.
Use case ends.
Extensions
- 2a. The user selects an invalid index.
- 2a1. FastTrack displays an error message telling the user to key in a valid index.
- 2a2. User re-enters the edit command with the index.
- 2a3. Steps 2a1-2a2 are repeated until the index provided is valid.
Use case resumes from step 3.
- 2b. The user inputs invalid data (wrong format)
- 2b1. FastTrack displays an error message telling the user to key in information in correct format.
- 2b2. User re-enters the edit command with information.
- 2b3. Steps 2b1-2b2 are repeated until the information provided is of correct format.
Use case resumes from step 3.
Non-Functional Requirements
- Should work on any mainstream OS as long as it has Java
11or above installed. - Should be able to hold up to 1000 expenses without a noticeable sluggishness in performance for typical usage.
- A user with above average typing speed for regular English text (i.e. not code, not system admin commands) should be able to accomplish most of the tasks faster using commands than using the mouse.
- FastTrack should be designed in a modular, scalable manner to enable easy addition of new features in the future.
- The code should be well-organized and well-documented to ensure ease of maintenance and debugging.
- FastTrack should protect user data from unauthorized access or modification.
- Any modification to the data will result in a prompt update to the user interface.
Glossary
- Mainstream OS: Windows, Linux, Unix, OS-X
Appendix: Instructions for manual testing
Given below are instructions to test the app manually.
Launch and shutdown
-
Initial launch
-
Download the jar file and copy into an empty folder
-
Double-click the jar file Expected: Shows the GUI with a set of sample expenses and categories. The window size may not be optimum.
-
-
Saving window preferences
-
Resize the window to an optimum size. Move the window to a different location. Close the window.
-
Re-launch the app by double-clicking the jar file.
Expected: The most recent window size and location is retained.
-
Saving data
-
Dealing with missing/corrupted data files
- In the case whereby your data files end up corrupted, FastTrack will wipe all data and allow you to start over with a clean slate.
Planned Enhancements
-
The current function of setting a budget does not properly take into account the occasion whereby the user actually wants to set a 0-dollar budget, and thus our team has opted to use a 0-dollar budget to be defined as the state of not having set a budget. We plan to make 0-dollars no longer the state of the user not setting a budget, and instead, use another proper indicator to show that a user has not set his or her budget.
-
The current expense statistics do not make it glaringly obvious that the user’s budget has been exceeded, as it is only shown in plain words without any form of colour-highlighting or ways to make the user notice it easily. We plan to make the indicator that one’s budget has been exceeded very obvious for the user to notice by highlighting and bolding the text.
-
The current method of taking in dates is unable to properly distinguish a proper date with reference to that of the days 29-31 of a month. (e.g. the 31st of February is a valid input for our current state, but we force the date to be the 28th of February in our application) We plan to properly handle this behavior for the months whereby the 29th-31st days do not exist by properly throwing an error.
-
The current colour choices in the expense statistics are possibly counter-intuitive, as we have chosen the colour red in cases whereby the user has spent more in the current month as compared to that of the previous month to indicate negative performance, but this might confuse users as the numbers shown are +x%, whereby x is the percentage point increase in spending as compared to the previous month. The same applies for spending lesser as compared to the previous month but in green. We are planning to make it such that the colour choice is more intuitive (Possibly swap the colour choices around).
Effort
The difficulty of FastTrack as a project was quite high, but one that allowed us to learn a lot. As our group lacked experience in working with a properly-structured team as well as a pre-existing codebase that had to be overhauled for our own purposes, we had to start from scratch to learn how exactly commands and user inputs were handled by the pre-existing AB3 codebase.
We faced numerous challenges in our journey to make FastTrack, not limited to:
- Learning how the codebase worked and how to restructure existing code.
- How to design the structure of FastTrack so that the
Category,ExpenseandRecurringExpenseManagermade sense. - Abstracting out certain checks into proper methods in the correct classes so as to reduce violations of principles.
- Testing of code.
Our group reused much of what AB3 had in place, with the main bulk of reusability coming from AB3’s parsing set-up and the model as well as storage systems, which we found to be useful as they worked in quite an intuitive and robust manner after we took some time to understand them.
However, we faced major difficulties in attempting to modify AB3 to suit FastTrack, as we realized
that AB3 primarily dealt with Person objects, which were only one type of entity, while we had to deal with 3 kinds of entities as
mentioned above. This led to multiple problems in our implementations and debugging stages, and we had to race against time
on multiple occasions to thankfully, successfully resolve these issues.
To sum it all up, our team did put in a significant amount of work to understand and mostly to successfully morph the existing AB3 codebase into FastTrack, and there is no doubt that we have achieved what we set out to do, and more.